OVH Lemp
Introduccion
En este post instalaremos un servidor Lemp (Linux, (E)nginx, Mariadb y PHP) en una maquina virtual alojada en OVH en la que mas adelante instalaremos varias aplicaciones.
Instalacion de servidor web nginx
sudo apt install nginx
Instalacion de MariaDB asegurando el servicio, ya que lo vamos a tener corriendo en el entorno de producción
sudo apt install -y mariadb-server mariadb-client
Una vez que tengamos mariadb instalado, para asegurarlo ejecutamos sudo mysql_secure_installation:
debian@hades:~$ sudo mysql_secure_installation

NOTE: RUNNING ALL PARTS OF THIS SCRIPT IS RECOMMENDED FOR ALL MariaDB
      SERVERS IN PRODUCTION USE!  PLEASE READ EACH STEP CAREFULLY!

In order to log into MariaDB to secure it, we'll need the current
password for the root user.  If you've just installed MariaDB, and
you haven't set the root password yet, the password will be blank,
so you should just press enter here.

Enter current password for root (enter for none):
OK, successfully used password, moving on...

Setting the root password ensures that nobody can log into the MariaDB
root user without the proper authorisation.

You already have a root password set, so you can safely answer 'n'.

Change the root password? [Y/n] y
New password:
Re-enter new password:
Password updated successfully!
Reloading privilege tables..
 ... Success!


By default, a MariaDB installation has an anonymous user, allowing anyone
to log into MariaDB without having to have a user account created for
them.  This is intended only for testing, and to make the installation
go a bit smoother.  You should remove them before moving into a
production environment.

Remove anonymous users? [Y/n] y
 ... Success!

Normally, root should only be allowed to connect from 'localhost'.  This
ensures that someone cannot guess at the root password from the network.

Disallow root login remotely? [Y/n] y
 ... Success!

By default, MariaDB comes with a database named 'test' that anyone can
access.  This is also intended only for testing, and should be removed
before moving into a production environment.

Remove test database and access to it? [Y/n] y
 - Dropping test database...
 ... Success!
 - Removing privileges on test database...
 ... Success!

Reloading the privilege tables will ensure that all changes made so far
will take effect immediately.

Reload privilege tables now? [Y/n] y
 ... Success!

Cleaning up...

All done!  If you've completed all of the above steps, your MariaDB
installation should now be secure.

Thanks for using MariaDB!
Instalacion de php php-fpm
Sudo apt install php7.3 php-fpm
Creamos un virtualhost al que vamos acceder con el nombre www.iesgnXX.es tendremos que crear un registro CNAME en la zona DNS.
Configuración iesgn:
Server {
    listen 80;
    listen [::]:80;

    root /srv/www/iesgn;

    index index.html index.htm index.nginx-debian.html;

    server_name www.iesgn07.es;

    location / {
            try_files $uri $uri/ =404;
    }
}
A la hora de crear el registro CNAME en la zona DNS sera necesario eliminar o modificar el registro que ya existe (www.iesgn07.es CNAME susano.iesgn.es.) ya que de no hacerlo salta un error.
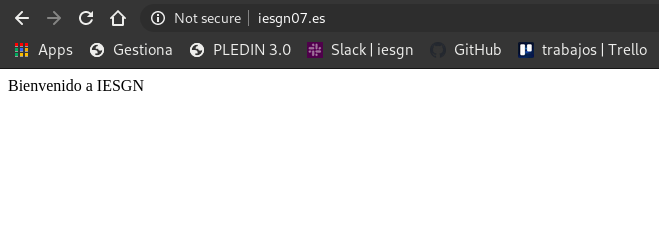
Cuando se acceda al virtualhost por defecto default nos tiene que redirigir al virtualhost que hemos creado en el punto anterior por lo que para ello lo configuraremos de la siguiente forma.
Configuración de default:
Server {
    listen 80 default_server;
    listen [::]:80 default_server;
    root /var/www/html;
    index index.html index.htm index.nginx-debian.html;

    server_name _;

    location / {
        return 301 http://www.iesgn07.es;
        try_files $uri $uri/ =404;
    }
Prueba de funcionamiento:
Al acceder a www.iesgnXX.es se nos redigirá a la página www.iesgnXX.es/principal por lo que tendremos que configurar el fichero iesgn.
Configuración de iesgn:
Server {
    listen 80;
    listen [::]:80;

    root /srv/www/iesgn;

    index index.html index.htm index.nginx-debian.html;

    server_name www.iesgn07.es;

    location / {
            return 301 http://www.iesgn07.es/principal;
    }
    location /principal {
            try_files $uri $uri/ =404;
    }
}
Prueba de funcionamiento:
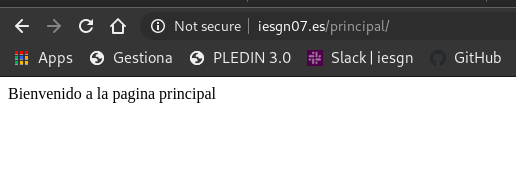
En la página www.iesgnXX.es/principal se mostrara una página web estática. En esta página aparecera nuestro nombre, y una lista de enlaces a las aplicaciones que vamos a ir desplegando posteriormente.
Empezamos descargando una plantilla html y a través de scp pasamos el fichero zip al directorio principal en /srv/www/iesgn
Prueba de funcionamiento:

Configuramos el nuevo virtualhost, para que pueda ejecutar PHP y determinamos que configuración tiene por defecto php-fpm (socket unix o socket TCP) para configurar nginx de forma adecuada.
Configuramos iesgn para que use ficheros php de la siguiente forma:
server {
    listen 80;
    listen [::]:80;
    root /srv/www/iesgn;
    index index.html index.htm index.nginx-debian.html index.php;

    server_name www.iesgn07.es;

    location / {
            return 301 http://www.iesgn07.es/principal;
    }

    location /principal {
            try_files $uri $uri/ =404;
    }
    location ~ \.php$ {
            include snippets/fastcgi-php.conf;
            fastcgi_pass unix:/run/php/php7.3-fpm.sock;
    }
}
Creamos un fichero info.php que demuestre que está funcionando el servidor LEMP en /srv/www/iesg y le añadimos el siguiente contenido:
<?php
phpinfo();
Prueba de funcionamiento:
